

How To Change Camera To Save To Sd Card
October four, 2016.

Some of our IP security cameras accept a microSD slot as a secondary storage method to tape video. This is an economical way to keep backup video recordings in case the NVR is stolen during a home invasion. Getting the backup video recording operational requires little setup within the camera's web interface, so make certain to have a way to power the camera as well a NVR with congenital-in PoE. The easiest route is to use a PoE injector equally we'll describe later in this article.
This guide can be used to configure your IP camera to record video to its internal SD menu, even if you are currently using the camera with a PoE NVR. If you are seeking information on recording still pictures to the SD bill of fare on your photographic camera, please read our guide how to record snapshots with your security camera.
Footstep i: Prerequisites
Insert Your SD Carte du jour
Insert the SD carte du jour you want to use into the SD slot on your security camera. The SD form factor and accustomed capacity volition vary depending on the model of the camera.
Power the Camera
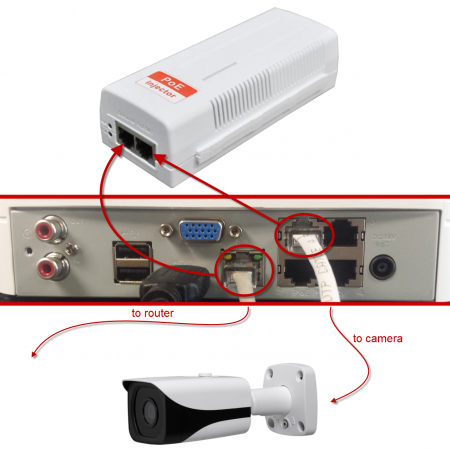
Power your camera using a PoE injector. Please note the required IEEE standard for the camera you are powering vs the PoE injector y'all are using. A camera requiring IEEE 802.3at (PoE+) will not exist powered by an IEEE 802.3af PoE injector. Do non use a passive PoE power injector that is commonly used for wireless admission points; it will damage the camera.
If you are using the camera without an NVR, please read How to connect an IP camera to a estimator to power and access the camera.
If you are currently using the camera with a PoE NVR, follow the steps below to disconnect the camera from the NVR and connect it to a PoE injector:
- Bring the PoE injector to your NVR and plug it into a surge protector
- Disconnect the LAN cable from your NVR and connect information technology to the LAN port on your PoE injector
- Disconnect the camera you lot wish to configure or view from the PoE switch on the dorsum of the NVR and connect it to the PoE port on the PoE injector
Access the Camera at its IP Address
- Using a computer on your local network open command prompt
- Discover the scope of your network by typing
ipconfigand then printing [Enter]- Watch the video below on using the control prompt. You will need to gather 2 pieces of data:
- Default Gateway
- Subnet Mask
Using the Control Prompt
- Download and install our IP config tool
- Open up the config tool and search for the photographic camera on your network.
- Change the photographic camera's IP address to match the scope of your network using our guide on how to find IP cameras on the network
- Using Chrome or Internet Explorer get to the cameras IP accost
Login
To log in using your spider web browser, follow the guides below. All of our IP security cameras are compatible with Internet Explorer and some as well support Chrome and Firefox.
- Chrome
- Internet Explorer
- Firefox
Set Engagement & Fourth dimension
 [+] Click Image to Enlarge
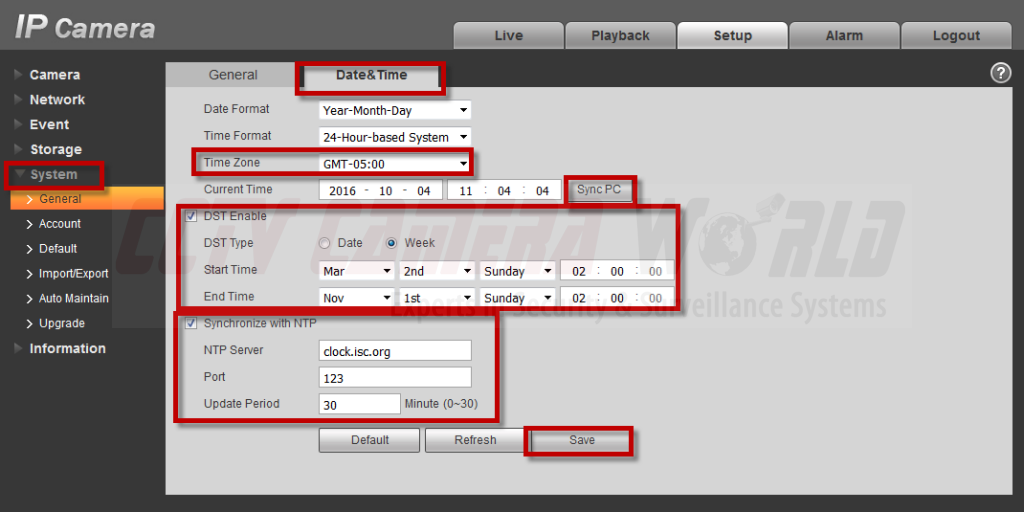
Navigate to SETUP > SYSTEM > GENERAL > DATE&Fourth dimension
1) Configure your time zone from the drop-downwards box
two) Sync the electric current time with your PC
3) Configure DST
4) Synchronize with an NTP server
v) Relieve your settings
Stride 2: Navigate to Local Storage
 [+] Click Prototype to Overstate
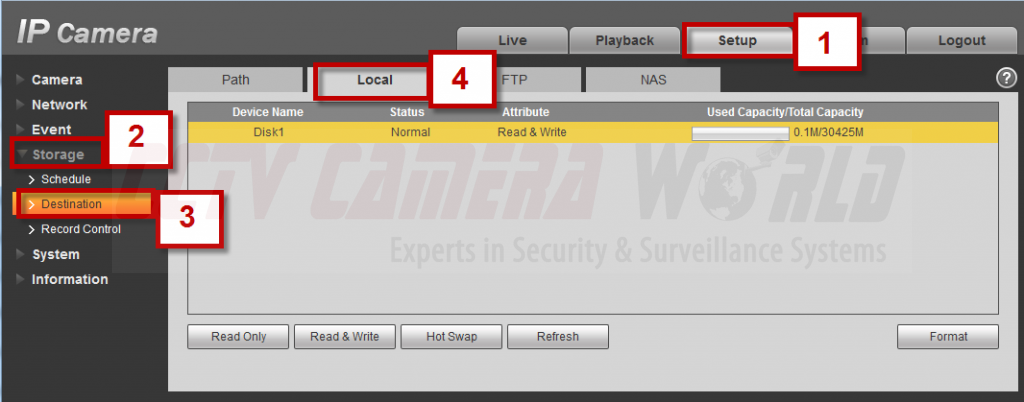
1) Click the SETUP tab at the acme of the page
2) Click STORAGE on the side carte
iii) Click Destination under the STORAGE dropdown
four) Click the LOCAL tab
Step iii: Format the SD Card
Delight cheque the camera specifications to decide the maximum SD bill of fare storage capacity supported. For the steps beneath you volition need to have the microSD card inserted in the camera'southward microSD slot.
 [+] Click Paradigm to Enlarge
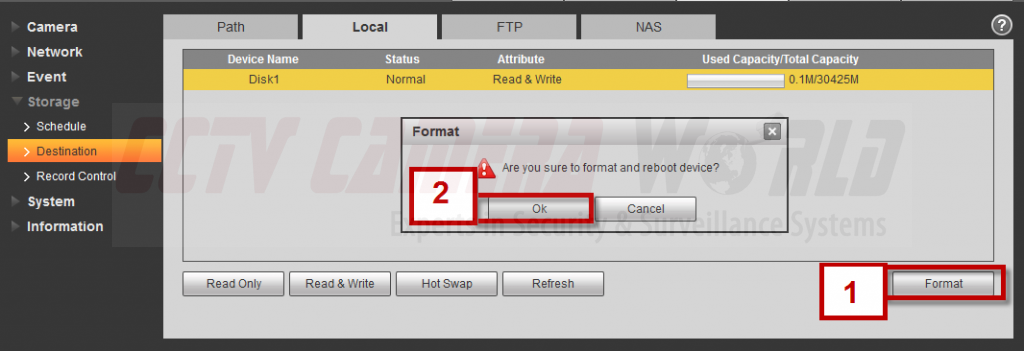
1) Click FORMAT to format the menu
2) Click OK
![[+] Click Image to Enlarge](https://www.cctvcameraworld.com/cms/wp-content/uploads/format-successfull-1024x391.png) [+] Click Image to Overstate
[+] Click Image to Overstate
The device will format and reboot. Log in again and navigate dorsum to STORAGE.
Step 4: Verify Overwrite on Disc Total
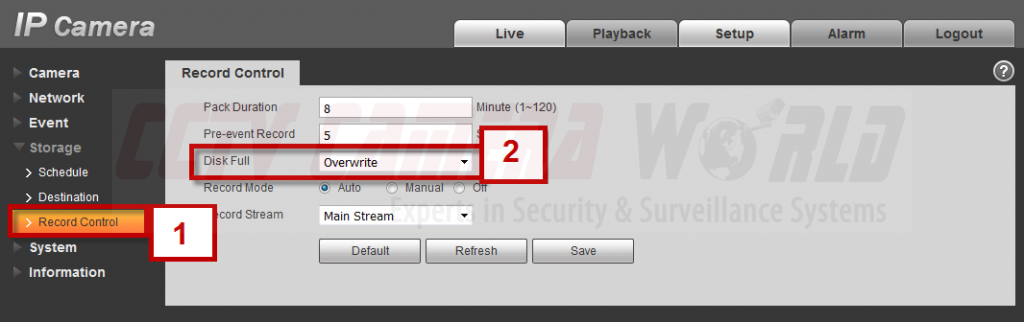 [+] Click Image to Overstate
ane) Select RECORD CONTROL from the STORAGE dropdown on the left
2) Verify the dropdown next to Disk FULL is set to OVERWRITE
If you fabricated whatsoever changes click Salvage.
It is important to notation that setting overwrite will erase older video. The amount of recording stored on the SD card depends on the bit charge per unit of the video being recorded, the amount of move in the scene, and the capacity of the SD card. Time would be of the essence to go to the camera shortly after the main NVR is stolen, and so that footage of interest is not lost.
Step five: Configure the Recording Schedule
![[+] Click Image to Enlarge](https://www.cctvcameraworld.com/cms/wp-content/uploads/step-5a-configure-schedule-1024x522.png) [+] Click Image to Enlarge
[+] Click Image to Enlarge
a1) Select SCHEDULE nether the STORAGE dropdown on the left
a2) Select the record types that you would like to configure
a3) Click SETUP side by side to a solar day you would like on the schedule
![[+] Click Image to Enlarge](https://www.cctvcameraworld.com/cms/wp-content/uploads/step-5b-configure-schedule-1024x472.png) [+] Click Prototype to Enlarge
[+] Click Prototype to Enlarge
b1) Configure the days that y'all would like this setting to take place
b2) Configure the times and types of recording
b3) Click SAVE
![[+] Click Image to Enlarge](https://www.cctvcameraworld.com/cms/wp-content/uploads/step-5c-configure-schedule-1024x461.png) [+] Click Image to Overstate
[+] Click Image to Overstate
c1) Click SAVE again
Step six: Configure Motion Detection
![[+] Click Image to Enlarge](https://www.cctvcameraworld.com/cms/wp-content/uploads/step-6a-configure-motion-detection-1024x473.png) [+] Click Image to Overstate
[+] Click Image to Overstate
a1) Select EVENT on the left Carte
a2) Click ENABLE
a3) Click SETUP next to WORKING Menstruum
![[+] Click Image to Enlarge](https://www.cctvcameraworld.com/cms/wp-content/uploads/step-6b-configure-motion-detection-1024x634.png) [+] Click Image to Enlarge
[+] Click Image to Enlarge
b1) Select the days that you would like to configure the working menstruation for motion detection recording on your security photographic camera
b2) Configure the time periods
b3) Click SAVE
![[+] Click Image to Enlarge](https://www.cctvcameraworld.com/cms/wp-content/uploads/step-6c-configure-motion-detection-1024x479.png) [+] Click Image to Enlarge
[+] Click Image to Enlarge
c1) Brand certain both ENABLE and Tape are selected
c2) Click Salvage
Step vii: Playback
Now that the IP Camera is configured, become create a motion event in front of the photographic camera to test its functionality. I went to the camera and waved my arms around for a few seconds.
![[+] Click Image to Enlarge](https://www.cctvcameraworld.com/cms/wp-content/uploads/step-7a-create-motion-event-1024x408.png) [+] Click Image to Overstate
[+] Click Image to Overstate
a1) Click on STORAGE on the left card
a2) Select DESTINATION under the STORAGE dropdown
a3) Select the LOCAL tab
You should find some storage space >.1M being used past your SD card. If you don't go back and check your configuration settings again by post-obit this guide.
Here'south how to playback recorded video from the photographic camera's SD menu:
b1) Click on the PLAYBACK tab on the top of the page
Here you'll come across the motion consequence in yellow on the timeline at the bottom of the page.
![[+] Click Image to Enlarge](https://www.cctvcameraworld.com/cms/wp-content/uploads/step-7b-create-motion-event-1024x739.png) [+] Click Epitome to Overstate
[+] Click Epitome to Overstate
You can select an area almost the move event then change the range of the timeline in the lower right corner. Using the scissors you can select a block of recording for export to your computer.
![[+] Click Image to Enlarge](https://www.cctvcameraworld.com/cms/wp-content/uploads/step-7c-create-motion-event-1024x727.png) [+] Click Paradigm to Overstate
[+] Click Paradigm to Overstate
When you accept finished you lot may connect the IP security camera to the PoE NVR again. Information technology will negotiate an IP address and attach it to a channel automatically.

Matt Rossi is a Technical Support Managing director at CCTV Camera Globe, a leading CCTV Camera distributor located in Buffalo, NY. He is a technical support expert for everything video surveillance related.
Connect with Matt via: Facebook
Source: https://www.cctvcameraworld.com/recording-sd-card-ip-security-camera/
Posted by: reyesfonse1937.blogspot.com
0 Response to "How To Change Camera To Save To Sd Card"
Post a Comment